FileZilla एक बहुत ही पोपुलर FTP software है। इसका interface उपयोग करने में भी बहुत आसान है और user-friendly है। आप FileZilla client को web server से आसानी से Connect कर सकते है।
इस आर्टिकल में मैं आपको बताऊंगा FileZilla FTP client को Web server से कैसे connect किया जाता है।
इससे पहले की आर्टिकल में हमने 6 best ftp client के बारे में बताया था जिन्हें आप Window और Mac दोनों में इस्तेमाल कर सकते है।
तो चलिए filezilla tutorial को शुरू करते है…
FileZilla FTP Client को Web Server से Connect कैसे करें
1. सबसे पहले अपने computer में FileZilla FTP client download करें। फिर FileZilla FTP client को Open करें। FileZilla FTP software download करने के लिए यंहा क्लिक करें।
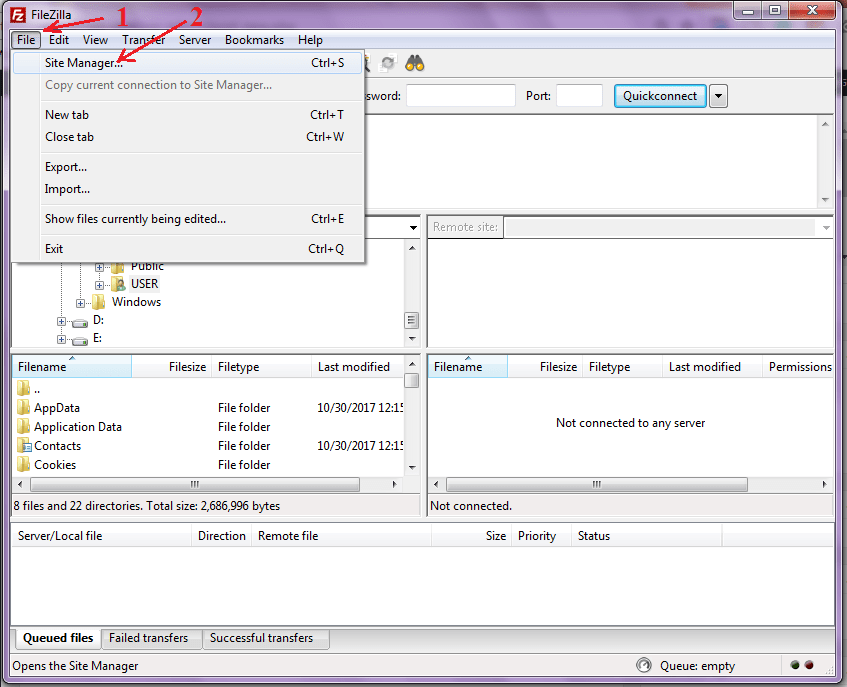
2. इसके बाद File >> Site Manager पर क्लिक करें।

3. Site Manager पर क्लिक करते ही आपके सामने FileZilla FTP server की एक नयी पेज ओपन हो जायेगी। यंहा आपको “New Site” पर क्लिक करना होगा फिर अपनी साईट का नाम (कोई भी नाम) enter करें।
अगले स्टेप में आपको Host name दर्ज करना होगा। फिर Protocol पर क्लिक करके Drop down menu से “FTP – File Transfer Protocol select” करना होगा।
इसके बाद FTP server information जैसे FTP password, user name और port enter करना होगा। ये सारी FTP account information आप अपनी web hosting cPanel से प्राप्त कर सकते है।

आप FTP में Port के लिए 21 दर्ज करें और SFTP port के लिए 22 का उपयोग करें।
4. अपनी FTP server information दर्ज करने के बाद “Connect” बटन पर क्लिक करें।
अब आपका वेब सर्वर FileZilla FTP Client से जुड़ जायेगा। कंप्यूटर की files FileZilla में बाईं ओर दिखती है, और आपके web server (website) की folders और files दाईं ओर प्रदर्शित होती है।
अब आप FileZilla FTP client की मदद से अपनी website (web server) में files को आसानी से edit या upload कर सकते है।
अगर यह आर्टिकल आपके लिए helpful साबित हुई है, तो इसे share करना न भूलें!
May blogger ko filezilla FTP se connect karna chahta hu par host aur port kaha milega kripya bataye.