All In One WP Security & Firewall प्लगइन 700,000+ Active installations और 5-star rating के साथ बहुत पोपुलर और सबसे अच्छा Security plugin है। प्लगइन आपके वर्डप्रेस साइट पर Extra security layer और firewall जोड़ता है। इस ट्यूटोरियल में, मैं All In One WP Security & Firewall Plugin Settings शेयर करने जा रहा हूं ताकि आप अपनी साइट को बुरे लोगों से सिक्योर कर सकें। यहाँ एक गाइड है – WordPress Website Secure Kaise Kare?
यह Tons of security features के साथ आता है जैसे कि Brute force login protection, password strength, built-in captcha, database prefix options, file permissions, .htaccess/wp-config backups और firewall protection। यदि आपके वर्डप्रेस साईट में कोई फाइल बदल गई है तो इसका स्कैनर आपको अलर्ट करता है।
प्लगइन 100% मुफ़्त है और आपकी WordPress website security को एक नए स्तर पर ले जाता है।
Key features
- डिफ़ॉल्ट “admin” का पता लगाता है और उसे बदलने की अनुमति देंता है।
- Password strength tool के साथ, आप बहुत strong passwords बना सकते हैं।
- Brute Force Login Attack से बचाता है।
- Failed login attempts और user’s IP address को दिखाता है।
- Google reCaptcha या plain maths captcha जोड़ सकते है।
- Bad users को Ban कर सकते है।
- आप एक क्लिक के साथ default WP prefix बदल सकते हैं।
- WordPress dashboard से file editing disable करता है।
आइये अब All In One WP Security & Firewall Plugin Settings को देखते है…
All In One WP Security & Firewall Plugin Settings Complete Guide
All In One WP Security & Firewall Plugin Settings को कॉन्फ़िगर करना एक कठिन काम नहीं है। इस ट्यूटोरियल को फॉलो करके, आप इसे अपनी साइट पर आसानी से Set up कर सकते हैं और अपनी साइट को Security breaches से Secure कर सकते हैं।
इसके अलावा, प्लगइन सेटिंग्स को basic”, “intermediate” और “advanced” tabs में categorized किया है।
सबसे पहले, अपने WordPress साइट में All In One WP Security & Firewall Plugin को install और activate करें। एक बार Activate होने के बाद, यह WP Security लेबल के साथ आपके वर्डप्रेस डैशबोर्ड में एक नया मेनू आइटम जोड़ देगा । बस उस पर क्लिक करें। यह आपको प्लगइन के डैशबोर्ड पर ले जाएगा।
यहाँ All In One WP Security & Firewall plugin की Best settings है जिसे आपको पालन करने की आवश्यकता है।
Settings
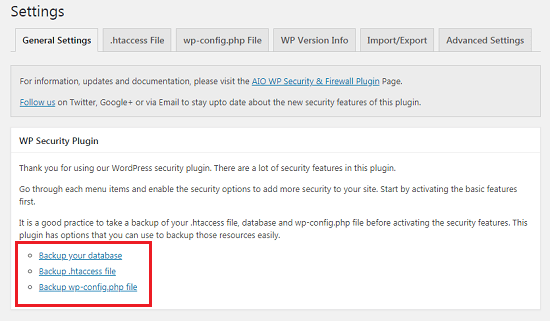
यहां से आप अपनी database, .htaccess file, wp-config.php file का बैकअप लें सकते है। ताकि जरूरत पड़ने पर आप फिर से अपनी फाइल को रिस्टोर कर सकें।
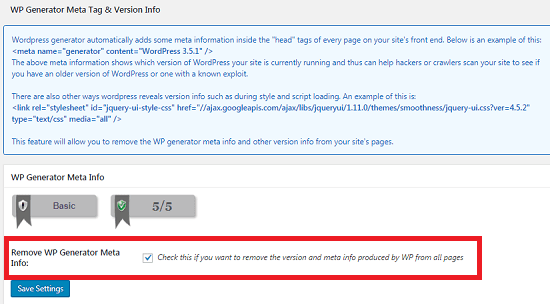
WP Version Info tab, सभी पेज से WP version और meta info को हटा देता है जो securities के लिए आवश्यक है।
User Accounts
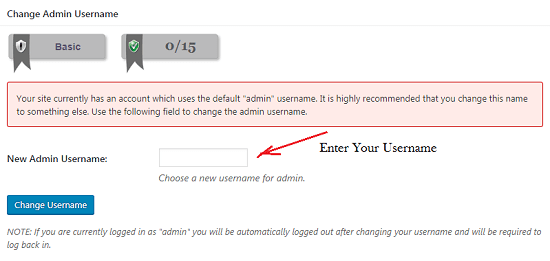
WordPress installation के समय “admin” का उपयोग करता है। यह सुरक्षा के नजरिए के हिसाब से सही नहीं है।
हैकर्स इसका लाभ उठाते हैं और लगातार Username के लिए “admin” का उपयोग करके पासवर्ड का अनुमान लगाने की कोशिश करते हैं।
इसलिए WordPress Admin Username बदलना आपकी साइट को Secure करने का सबसे पहला पहलू है। WordPress Username Change कैसे करें?
लेकिन शुक्र है कि यह प्लगइन ऐसा करने की अनुमति देता है। इस सेक्शन का उपयोग करके, आप आसानी से अपना Admin username बदल सकते हैं।
यह स्टेप आपकी साइट पर Brute Force Login Attacks को काफी हद तक कम करता है।
User Login
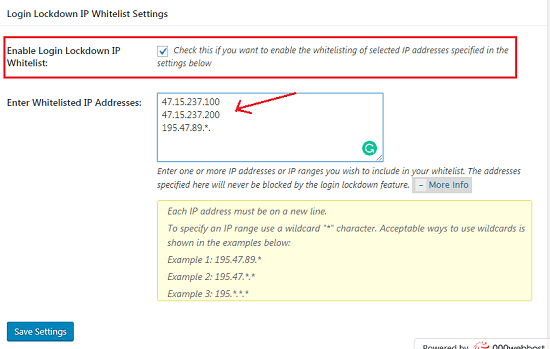
Login Lockdown टैब द्वारा, आप अपनी साइट से बुरे लोगों को Lockdown कर सकते हैं।
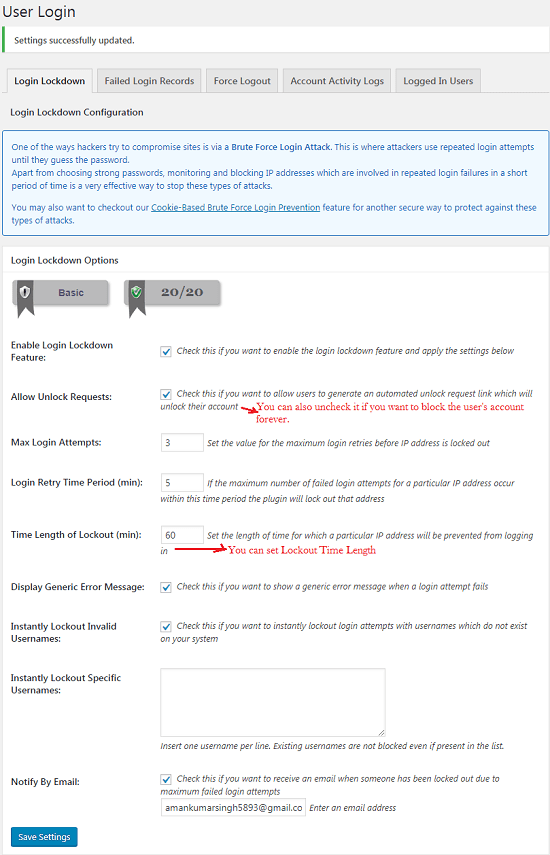
Login Lockdown IP Whitelist Settings पर स्क्रॉल करें, Enable Login Lockdown IP Whitelist बॉक्स को चेक करें और उन Whitelisted IP Addresses को Add करें जिन्हें आप login lockdown feature द्वारा ब्लॉक नहीं करना चाहते हैं।
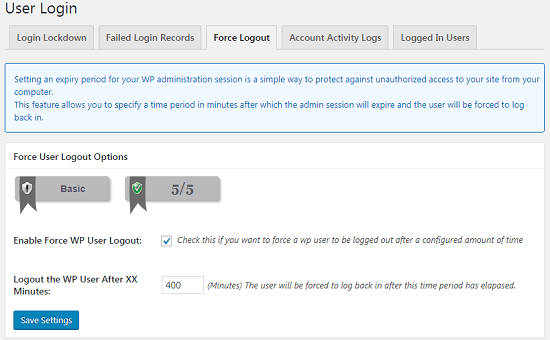
Force Logout टैब के तहत , आप time period को मिनटों में Set कर सकते हैं। जब administrator session समाप्त हो जाता है, तो User automatically साइट से लॉगआउट हो जायेगा।
जब आप अपनी साइट लॉग आउट करना भूल जाते हैं तो unauthorized access से बचने का यह एक सरल तरीका है।
आप इसे 400 मिनट (6 घंटे) पर सेट करते हैं। अन्यथा, टाइमआउट होने पर, यह आपको भी लॉग आउट कर देगा।
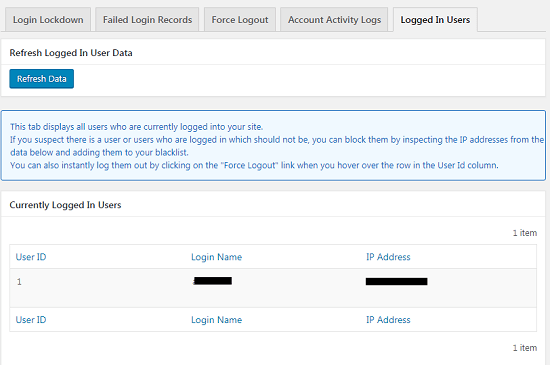
Logged in Users tab से, आप उन लोगों को देख सकते है, जो आपकी साइट में currently लॉग ऑन है।
User Registration
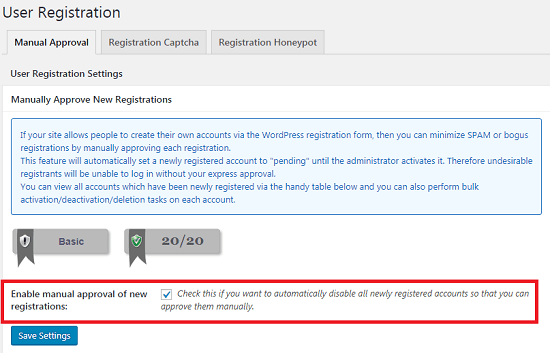
Manuall Approve आपको SPAM or bogus registrations से बचने में काफी मदद करता है। बस आपको Enable manual approval of new registrations बॉक्स को चेक करना है।
अब जब users आपकी साइट को register करेंगे, तो वे Pending में चलें जाएंगे। आपको उन्हें Manually approve करने की आवश्यकता है।
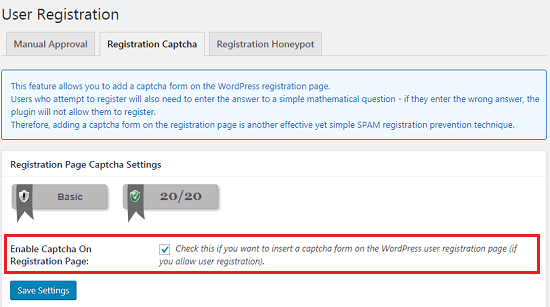
Registration Captcha टैब के तहत , आप User registration page पर एक captcha form जोड़ सकते हैं। जब यूजर Register करने का प्रयास करते हैं, तो उन्हें एक Simple mathematical question का उत्तर देना होगा। SPAM registration को रोकने के लिए यह एक और प्रभावी और सरल तरीका है।
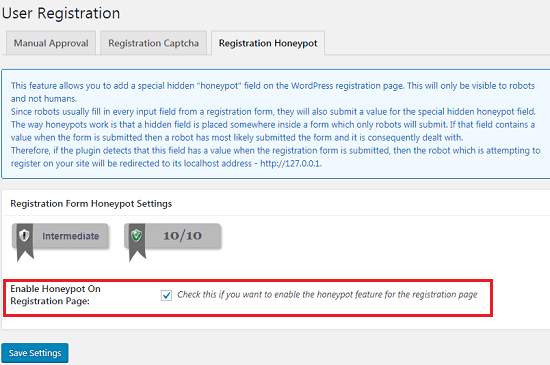
Registration Honeypot वर्डप्रेस Registration page पर एक Special hidden “honeypot” फ़ील्ड जोड़ता है। यह केवल रोबोटों को दिखाई देगा। SPAM registration को रोकने के लिए यह भी एक बढ़िया आप्शन है।
Database Security
कोई भी Changes करने से पहले अपनी साइट के Database का बैकअप कर लें।
Database किसी भी वर्डप्रेस वेबसाइट की सबसे महत्वपूर्ण फ़ाइल है जिसमें कीमती जानकारी होती है।
इसलिये, हैकर्स SQL injections, malicious और automated code का उपयोग करके कुछ Database tables को targate करते है। लेकिन WordPress table prefix को बदलकर, आप अपने database में extra security layer जोड़ सकते हैं।
यहाँ से आप prefix को “wp_” से बदलकर कुछ भी सेट कर सकते हैं। ताकि हैकर्स इसका अंदाजा न लगा सकें। प्लगइन automatically नए DB Table Prefix generate कर सकता है या आप अपनी पसंद के अनुसार generate कर सकते हैं।

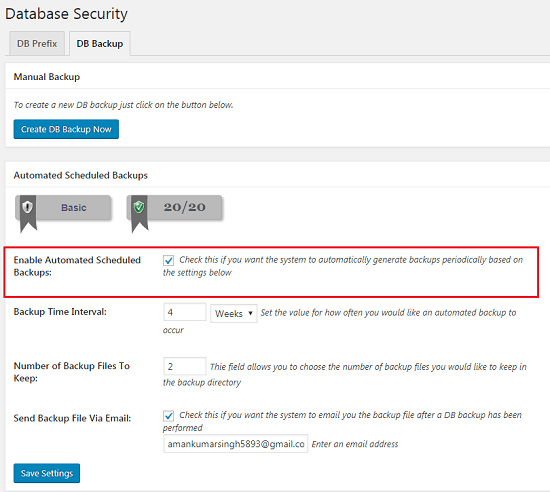
Database Backup टैब आपको Database backups करने के लिए समय सेट करने की अनुमति देता है। बस Enable Automated Scheduled Backups बॉक्स को चेक करें और अन्य सेटिंग्स को डिफ़ॉल्ट रखें।
Filesystem Security
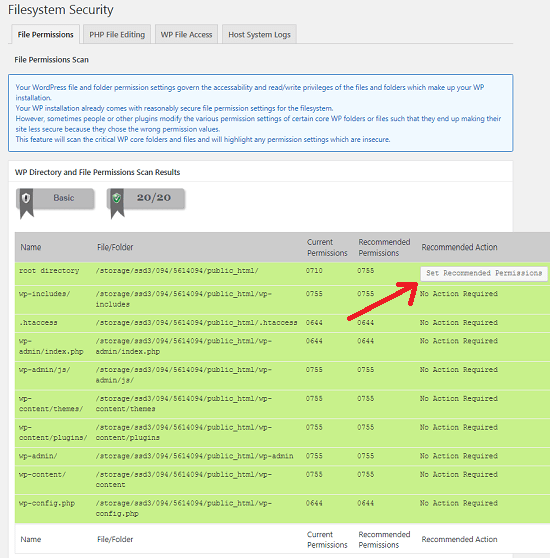
हालंकि वर्डप्रेस Secure file permission settings के साथ आता है। लेकिन कभी-कभी Users या Plugins अनुमतियाँ सेटिंग्स को बदल देते हैं, जो आपकी साइट की Security को कमजोर करता है। प्लगइन WP core folders & files को स्कैन करता है और Permission settings को हाइलाइट करता है जो Insecure हैं और एक क्लिक द्वारा ठीक करने की अनुमति देता हैं।
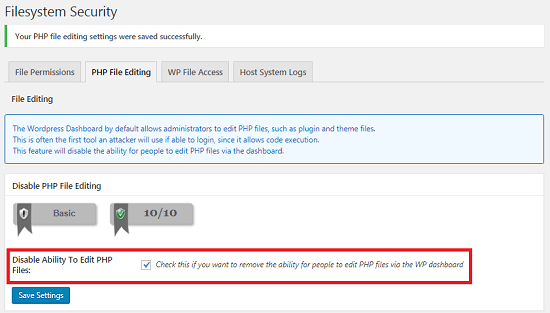
PHP File Editing टैब का उपयोग करके आप WP dashboard के माध्यम से PHP file editing क्षमता को Disable कर सकते हैं।
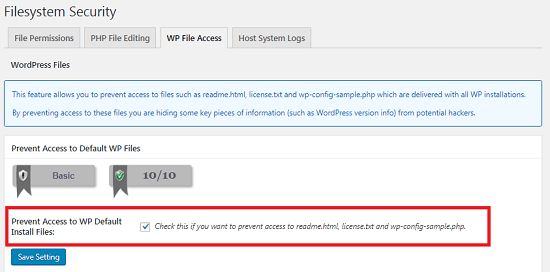
WP Files Access टैब readme.html, license.txt and wp-config, sample.php जैसी फाइलों को access करने से रोकता है और हैकर्स से कुछ जानकारी (जैसे WordPress version info) को छुपाता है।
Blacklist Manager
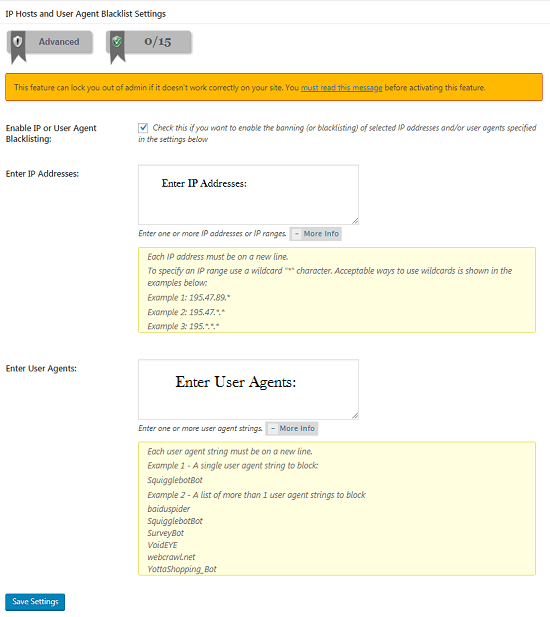
यदि आप selected IP addresses को Blacklist करना चाहते हैं, तो प्लगइन कर सकता है। बस Enable IP or User Agent Blacklisting के बॉक्स को चेक करें। IP Addresses and User Agents दर्ज करें जिन्हें आप ब्लैकलिस्ट करना चाहते हैं।
Firewall
यह Features आपकी .htaccess फ़ाइल में कुछ कोड जोड़कर आपकी साइट पर Basic firewall security protection rules जोड़ती हैं। इसलिए, इस Process को करने से पहले अपनी .htaccess फ़ाइल का बैकअप बना लें।
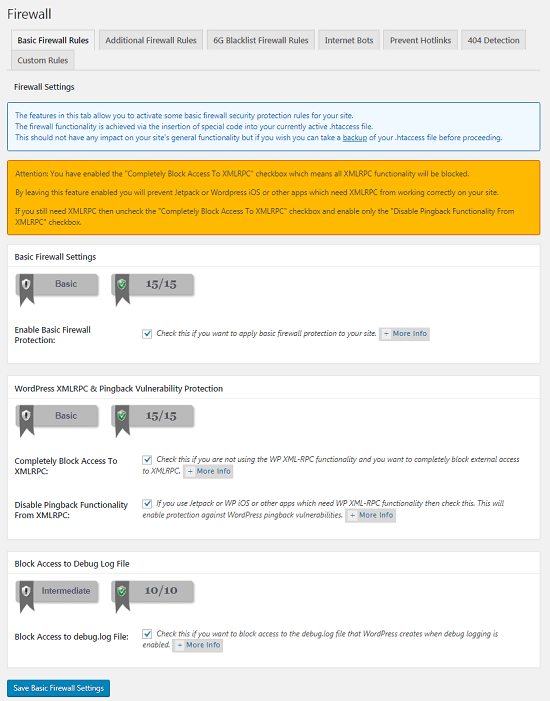
जब आप Completely Block Access To XMLRPC के बॉक्स को चेक करते है, तो यह आपके साईट से XMLRPC को Completely Disable कर देगा और Yellow बॉक्स में अटेंशन दिखाएगा।
यदि आप अपनी साइट पर XML-RPC functionality का उपयोग नहीं कर रहे हैं, तो इसे Disable रखें। लेकिन यदि आप नहीं जानते हैं कि आपकी साइट XML-RPC functionality का उपयोग कर रही है या नहीं, तो इसे Uncheck रखें। यहाँ एक स्क्रीनशॉट है।

Additional Firewall Protection टैब .htaccess फ़ाइल में Special code जोड़कर आपकी साइट पर Advanced firewall settings जोड़ने की अनुमति देती है।
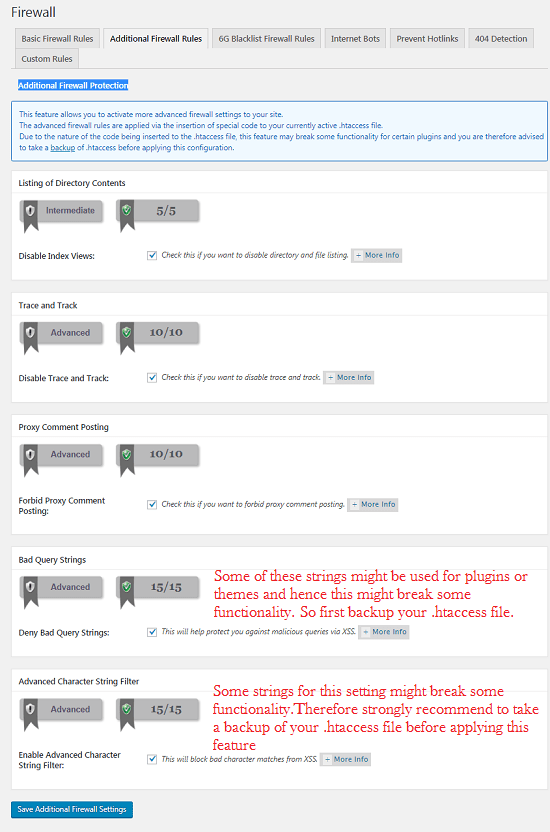
यदि आप Bad Query Strings और Advanced Character String Filter को Enable करते है, तो ये आपकी साईट Functionality को Break कर सकते है।
इसे Enable करने के बाद अपनी साईट को एक बार चेक करें। यदि Proper work करती है, तो आप अगले स्टेप के लिए जा सकते है।
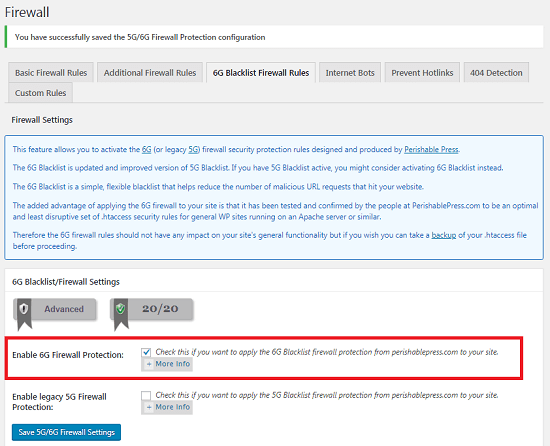
6G Blacklist Firewall Rules टैब आपकी साईट पर Perishable Press द्वारा डिज़ाइन और निर्मित 6G (or legacy 5G) firewall security protection add करता है। यदि आप अपनी साइट पर 5G blacklist का उपयोग करते हैं, तो आपको इसके बजाय 6G blacklist का उपयोग करना चाहिए।
6G Blacklist आपकी वेबसाइट पर आने वाले Mlicious URL requests की संख्या को कम करने में मदद करता है। अधिक जानकारी के लिए पर More info पर क्लिक करें।
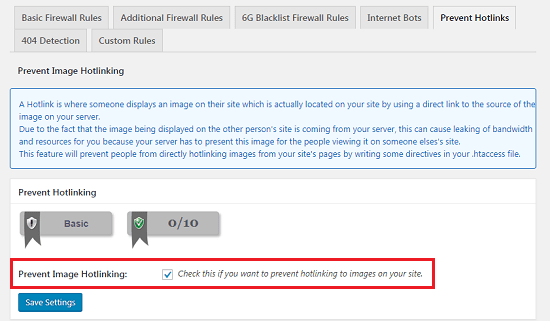
आप Prevent Hotlinking टैब पर जाकर Image Hotlinking Disable कर सकते हैं। जब कोई यूजर आपकी साइट के Image URL को कॉपी करता है और किसी अन्य साइट पर पेस्ट करता है, तो इसे Image Hotlinking कहा जाता है। यह आपकी साइट Performance और bandwidth को बुरी तरह प्रभावित करता है। जब कोई यूजर hotlink image देखता है, तो यह original server से लोड होता है।
इससे बचने के लिए, Prevent Image Hotlinking के बॉक्स को चेक करें। आप नीचे स्क्रीनशॉट देख सकते हैं,
Brute Force
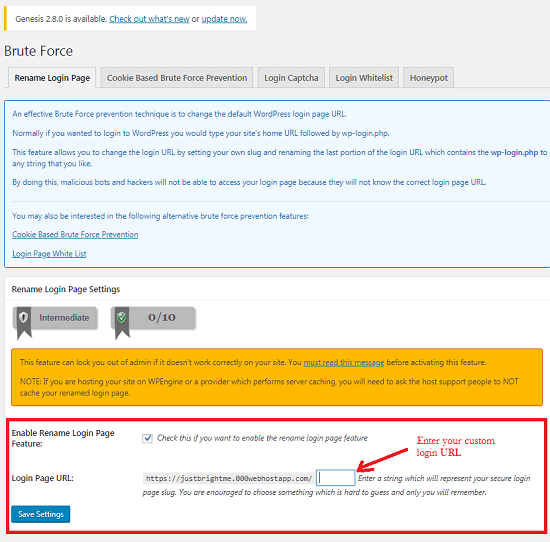
Rename Login Page टैब द्वारा अप WordPress admin login URL page change कर सकते है। बस Enable Rename Login Page Feature को चेक करें और अपना Custom login URL दर्ज करें।
आप login captcha tab द्वारा अपनी साइट के login page, registrations form आदि में Captcha जोड़ सकते हैं।
SPAM Prevention
यदि आप अपनी साइट के comment form में कैप्चा Enable करना चाहते हैं, तो प्लगइन अनुमति देता है।
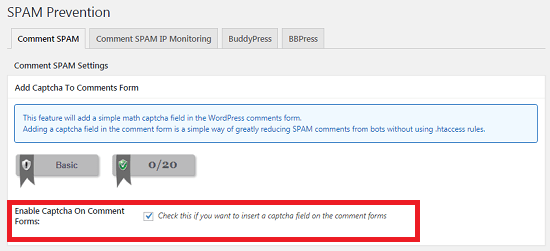
यह आप्शन Spam comments से छुटकारा पाने में आपकी सहायता करेगा। उसके बाद बाकी सेटिंग्स को डिफॉल्ट छोड़ दें।
- 5 Best WordPress Antispam Plugins हिंदी
- Antispam Bee WordPress Plugin की मदद से Spam Comments कैसे रोंके
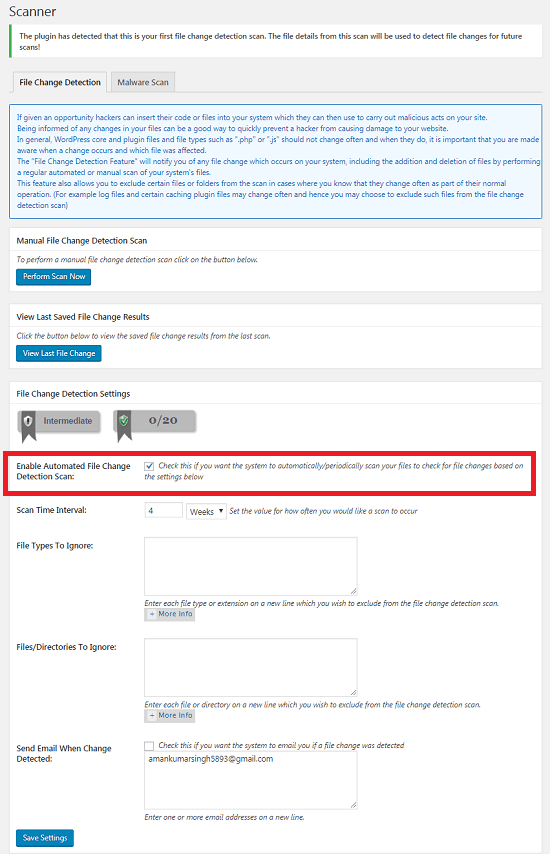
Scanner
Scanner आपके साईट पर होने वाली किसी भी file change की सूचना देता है, जिसमें फ़ाइलों का addition और deletion भी शामिल है। आप स्कैन के दौरान certain files or folders को Ignore भी कर सकते हैं।
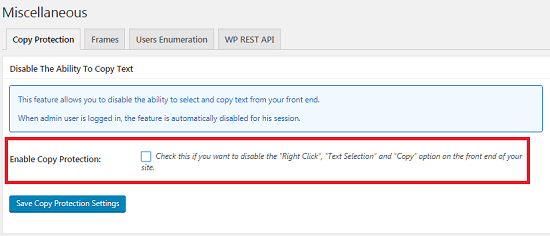
Miscellaneous
Copy Protection टैब आपकी साइट पर “Right Click”, “Text Selection” और “Copy” आप्शन को Disable करता है। यह feature आपकी कंटेंट को Copier bloggers से बचाने में मदद करता है।
यह आप पर निर्भर करता है कि आप इसे Enable करना चाहते हैं या नहीं।
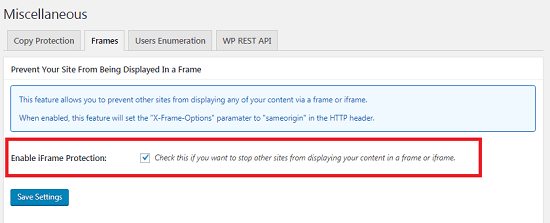
iFrame
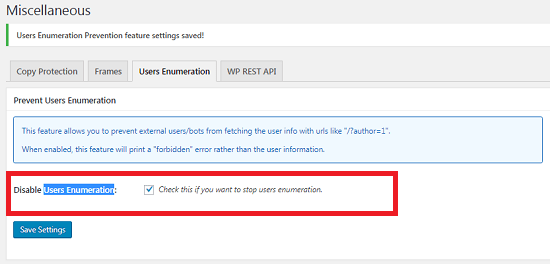
Users Enumeration
इसके अलावा, यदि आप अपनी साइट को Maintenance mode में डालना चाहते हैं , तो प्लगइन ऐसा कर सकता है।
बस इतना ही! यहाँ मैंने आपको Step by Step All In One WP Security & Firewall Plugin Settings दिखाया है। उम्मीद है, जब आप इसे अपनी साइट पर Install और Setup करेंगे, तो कोई समस्या नहीं होगी।
अगर आपको यह आर्टिकल आपको पसंद ई हो, तो इसे शेयर करना नहीं भूलें!
अच्छी जानकारी है धन्यवाद